Thursday, January 19, 2017
Editing a Photoshop Action
Editing Actions...
In summary here’s what you need to know to edit GTS.atn in the LR-Week5 folder
Step1
Send an image to Photoshop (In Lightroom, Rightclick on an image and Edit In > Photoshop
Or Startup Photoshop and Load a large photo at least 3000 x 2000 pixels and then Open the Action Panel
Menu:
Window > Actions
Step 2
Load the action you want to edit or locate it in the Action List.
We want to make a copy of it, but first we need to make a folder for the action.
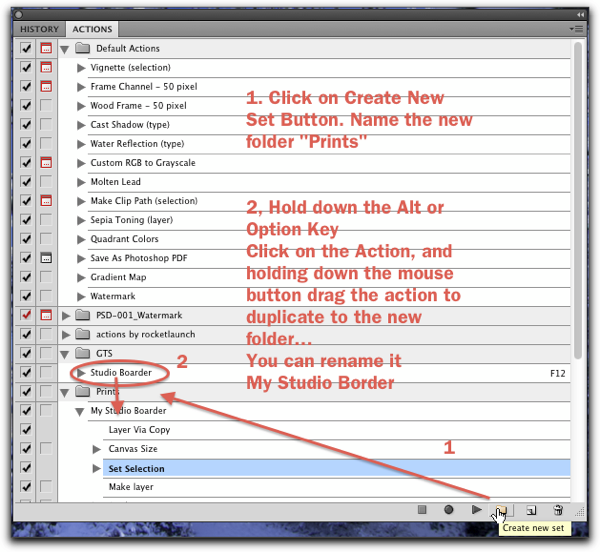
Most steps in an action can be edited… In the GTS.atn (Studio Print Action) You’ll want to edit the text, maybe the stroke…
Just double click the step… wait a bit… either a requester will popup or you can make edits right on the canvas. See the Text Tool Example below.

But, what if a step isnt editable? Just delete the step and re-record it!
Or, just make yourself a new action… Practice what you want to do… write the steps down...
and Camera! Lights! Action!
Part 2 You can do these steps in Photoshop Elements, or any image editor…
Heres the steps I recorded for the Studio Print
Step 1.
Duplicate your picture
(pc) (Control + J) (Mac) (Command + J)
Optional Step
Select an Adjustment layer like "Levels" or "Hue & Saturation or "Black and White" to change the photo an arty Sepia, duotone or Black and White!
Step 2.
Add white space around the photo.
PhotoShop: Menu: Image > Canvas Size
PSE: Menu: Image > Resize > Canvas...
Choose relative and 2 inches, 2 inches
Click OKAY
Step 3.
In the duplicate layer on the thumbnail of the photo
Press the (PC) Control key + click (left) mouse once
Press the (Mac) Command key + click the mouse once
this will put a selection around the photograph.
Step 4.
Create a new blank layer
Step 5.
Go to the Menu: Edit > stroke
choose 1 pixel (I like at least 4 pixels) and set the color (Black)(I like mid-gray) in the color swatch button
location, choose center.
Step 6.
Click Okay (You can change opacity if you wish)
Step 7.
Go to
menu
Select > Transform
In the tool bar change 100% width to 102% and 100% height to 103% Click the check mark
Step 8.
Go to
Menu: Edit > Stroke
Choose 1 pixel (I like 4 pixels) and change the color to black (I like a mid - gray) Click Okay
Step 9.
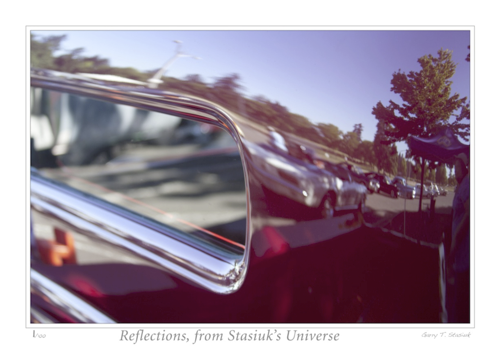
Use the type tool (Tool Bar), use at least a 36 pt fancy font Script like Minion or Trajan for the title “Yourname Studio”
N.B.
If you run this "action" and if you dont have any of the indicated fonts, Photoshop will substitute the "default" font.
Step 10.
use a written font like Hand Writing Dakota for the Number of the print (1 / 100) at the bottom left and your name at bottom right
Have fun!
Available link for download

Sunday, October 30, 2016
Efek Photoshop Keren Dengan Action Photoshop
Bagaimana cara membuat efek photoshop keren yang mudah di ikuti newbie? Untuk memperajari atau belajar membuat efek photoshop terbaik tidaklah sesulit yang dibayangkan, banyak beredar buku, ebook dan video panduan PS baik dari Internet maupun toko buku di daerah kamu. Tetapi untuk menjadi ahli dalam mengedit atau mendesain foto, modal utama yang kita perlukan adalah hanya niat dan keseriusan dalam belajar, tentunya dengan bimbingan atau pelatihan yang mudah untuk di mengerti untuk kita yang masih awam.
Kabar baiknya adalah untuk menjadi AHLI PHOTOSHOP yang terlihat profesional kamu TIDAK perlu lagi ikutan kursus belajar photoshop, membeli ebook tutorial, video panduan photoshop ataupun browsing2 di Internet yang memakan waktu!
Saya akan tunjukkan RAHASIANYA menjadi JAGOAN Edit Foto dengan WAKTU SINGKAT disini!! Paket Efek Photoshop keren ini sangalah tmudah di ikuti oleh newbie sekalian !! Berikut contoh hasil editan foto profesional, yang akan saya berikan ilmunya kepada Teman2 sekalian :


Gambar diatas adalah sedikit contoh sampel dari hasil EFEK PHOTOSHOP karya para editor foto profesional, yang hanya dibuat menggunakan sofware Photoshop saja!! Hasilnya sangat terlihat eye-catching dan luar biasa bukan?
Mungkin Kamu beranggapan cara membuat efek-efek diatass sangat rumit dan sukar untuk dipelajari! Tapi bagaimana jika saya beritahu, jika semua teknik diatas bisa kamu buat hanya dalam 1 menit saja!!!
Bagaimana bisa ? ini rahasianya..

PAKET DVD ACTION PHOTOSHOP berisis Koleksi Action Photoshop Siap Pakai Untuk Editor Foto yang handal dan profesional!
Apa itu Action Photoshop ?
Action Photoshop adalah semacam Plug in yang dapat kita gabungkan dengan program Photoshop untuk mengedit foto. Action Photoshop sangat mudah dipakai oleh pemula sekalipun! Hanya dengan 3 langkah mudah saja yaitu :
1. Buka Foto yang hendak kita edit.
2. Aktifkan dan Jalankan Action Photoshop.
3. SELESAI!!
Nb. Tutorial Penggunaan Action ada di dalam DVD.
Berikut Koleksi Action Photoshop lainnya :


Dan Masih Banyak Lagi Ation lainnya didalam paket tersebut, Totalnya ada 57 Action karya terbaik oleh pendesain profesionan untuk menciptakan 285 Variasi Efek Foto yang sangat menakjubkan!
Tapi Tunggu Dulu.. Masih Ada Bonusnya..
Bonus # 1 : Koleksi Video Tutorial Photoshop Untuk Fotografer, Total Durasi 20 Jam.
Video ini sangat mudah untuk kita kuti, karena dalam bahasa Indonesia. Materinya antara lain :
• Cara Menghaluskan wajah (100% seperti model)
• Cara mengganti-ganti Baju Pasfoto
• Cara Menghilangkan bekas stempel dari pasfoto
• Cara Mempertajam Warna Foto
• Cara Memperbaiki Foto yang Rusak
• Cara Memutihkan Gigi dan Merubah Warna Bola Mata
• Cara Menajamkan Warna Sunset
• Cara Membuat Foto Sketsa dan Mewarnai Foto Hitam Putih
• Cara Membuat Foto malam hari lebih dramatis
• Cara Membuat Efek Foto Sepia keren
• Cara Membuat Pasfoto berbagai ukuran (2R, 3R, 10R)
• Cara Memperjelas Foto Agar terlihat tidak pecah
• Cara Mengganti background foto dengan mudah
• Cara Mencetak edit foto dari kamera handphone
• dan masih banyak lagi video panduan lainnya!
Total Durasi paket kumpulan video tutorial photoshop ini adalah 20 jam. Berarti sama dengan kita mengikuti kursus photoshop selama 20 jam!
Bonus #2 : Paket Koleksi 130 Desain Frame Foto Instan Siap Pakai - Tinggal Masukkan Foto didalamnya!
Paket Frame ini berisi kumpulan Desain bingkai foto premium pilihan, dengan format PNG. Kita cukup drag foto ke dalamnya saja! Paket ini sangat cocok buat kamu pemilik ataupun yang ingin memulai usaha cetak foto digital semacam bisnis studio foto mini. Berikut contoh desain frame foto yang akan kamu dapatkan!


Bonus #3 : Sampel Pasfoto Kilat - Siap Cetak
Dengan paket sampel ini maka kita tidak perlu pusing lagi untuk membuat settingan pas photo, karena didalam paket ini sudah sangat lengkap dan juga terdapat template jas untuk keperluan usaha studio foto mini kamu!
Bonus #4 : Software Pendukung
Kamu juga tidak perlu pusing lagi untuk mencari-cari software pengedit foto photoshop ataupun Coreldraw, karena Kami akan berikan installer Coreldraw dan Photoshop Gratis buat kamu!
DVD ACTION PHOTOSHOP + BONUS VIDEO PANDUAN FOTOGRAFI + 130 DESAIN BINGKAI FOTO CANTIK + TEMPLATE PASFOTO / JAS + SOFTWARE Bisa kamu dapatkan hanya dengan harga Rp. 150.000,- saja!
Cukup Lengkap bukan? Paket ini juga sangat cocok buat kamu yang ingin memulai BISNIS percetakan semacam STUDIO FOTO MINI ataupun usaha cetak digital lainnya.
Oke langsung saja, berapakah HARGA dan bagaimana cara mendapatkannya? Untuk harga paket DVD Action Photoshop ini hanya Rp. 150.000,- saja, Gratis Garansi Bimbingan Konsultasi bila ada kesulitan!!
Available link for download
Friday, October 14, 2016
Equilibrium Photoshop Action


Video Tutorial
Equilibrium Photoshop Action
Create nice effects from your photos with little effort at all. Make sure to watch the Equilibrium Video Tutorial on how install and how to use it.The action will ONLY WORK IN THE ENGLISH VERSION OF PHOTOSHOP, If you are not using the English version of Photoshop, PLEASE CHANGE YOUR PHOTOSHOP TO ENGLISH VERSION follow the next steps for how change to Photoshop English Version
Package Content:
- EquilibriumAction.ATN
- Equilibrium_Shape.CSH
- Equilibrium_Pattern
- A tXt file with install instructions and links for video tutorial and download shapes
How to Install
- Open Photoshop
- Open Equilibrium Photoshop action folder
- From Equilibrium folder select Equilibrium Pattern, Equilibrium Shape and Equilibrium Action Files.
- Drag and drop this files in to anywhere photoshop workspace
Using The Action
- Open a photo to work with
- Review that the photo layer is locked and set as the ‘Background’.
- Create a new layer above the Background layer called ‘brush’. MUST be all lowercase.
- With the ‘brush’ layer selected, brush onto the areas of your photo that you want to apply the effect.
- Now click play on the action!
- After a few secons the action stop then you may be create any shape that you want and put this centered over your model.
- In the panel action clic in play
Download Link:
https://www.oboom.com/I0QVLZ90
http://rockfile.eu/7emr0ab676c6.html
http://turbobit.net/0lxl2wpqnl6u.html
http://24uploading.com/8nspiemsibv5/PSD_S_10459139_equilibrium_photoshop_action.rar.html
http://fileparadox.com/1h4dk1hqaupx/PSDKEYS_10459139_equilibrium_photoshop_action.rar
http://www.uploadable.ch/file/s6Hc2QeeMfrS/PSDKEYS_10459139_equilibrium_photoshop_action.rar
http://www.uploadcloud.pro/h2p5h6to43mw/PSDKEYS_10459139_equilibrium_photoshop_action.rar.html
Available link for download