Thursday, January 19, 2017
Editing a Photoshop Action
Editing Actions...
In summary here’s what you need to know to edit GTS.atn in the LR-Week5 folder
Step1
Send an image to Photoshop (In Lightroom, Rightclick on an image and Edit In > Photoshop
Or Startup Photoshop and Load a large photo at least 3000 x 2000 pixels and then Open the Action Panel
Menu:
Window > Actions
Step 2
Load the action you want to edit or locate it in the Action List.
We want to make a copy of it, but first we need to make a folder for the action.
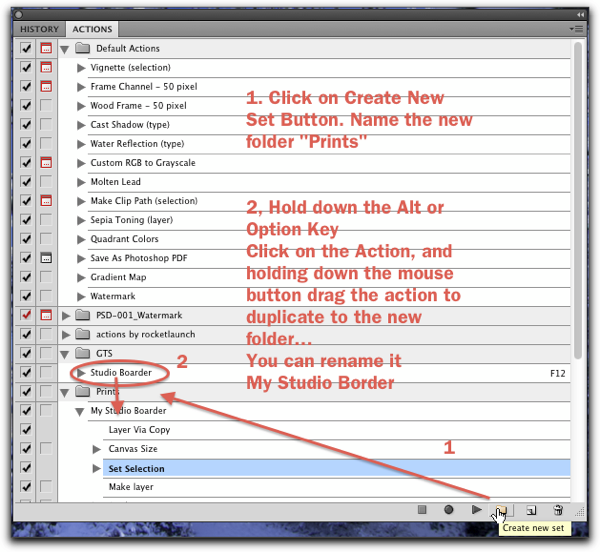
Most steps in an action can be edited… In the GTS.atn (Studio Print Action) You’ll want to edit the text, maybe the stroke…
Just double click the step… wait a bit… either a requester will popup or you can make edits right on the canvas. See the Text Tool Example below.

But, what if a step isnt editable? Just delete the step and re-record it!
Or, just make yourself a new action… Practice what you want to do… write the steps down...
and Camera! Lights! Action!
Part 2 You can do these steps in Photoshop Elements, or any image editor…
Heres the steps I recorded for the Studio Print
Step 1.
Duplicate your picture
(pc) (Control + J) (Mac) (Command + J)
Optional Step
Select an Adjustment layer like "Levels" or "Hue & Saturation or "Black and White" to change the photo an arty Sepia, duotone or Black and White!
Step 2.
Add white space around the photo.
PhotoShop: Menu: Image > Canvas Size
PSE: Menu: Image > Resize > Canvas...
Choose relative and 2 inches, 2 inches
Click OKAY
Step 3.
In the duplicate layer on the thumbnail of the photo
Press the (PC) Control key + click (left) mouse once
Press the (Mac) Command key + click the mouse once
this will put a selection around the photograph.
Step 4.
Create a new blank layer
Step 5.
Go to the Menu: Edit > stroke
choose 1 pixel (I like at least 4 pixels) and set the color (Black)(I like mid-gray) in the color swatch button
location, choose center.
Step 6.
Click Okay (You can change opacity if you wish)
Step 7.
Go to
menu
Select > Transform
In the tool bar change 100% width to 102% and 100% height to 103% Click the check mark
Step 8.
Go to
Menu: Edit > Stroke
Choose 1 pixel (I like 4 pixels) and change the color to black (I like a mid - gray) Click Okay
Step 9.
Use the type tool (Tool Bar), use at least a 36 pt fancy font Script like Minion or Trajan for the title “Yourname Studio”
N.B.
If you run this "action" and if you dont have any of the indicated fonts, Photoshop will substitute the "default" font.
Step 10.
use a written font like Hand Writing Dakota for the Number of the print (1 / 100) at the bottom left and your name at bottom right
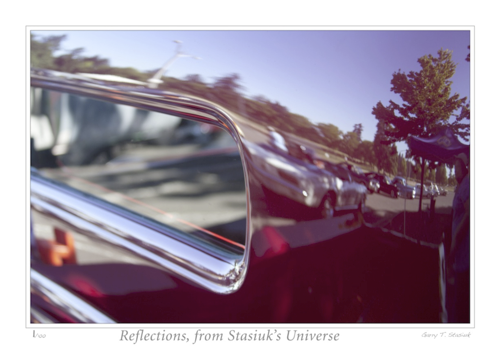
Have fun!
Available link for download

Wednesday, January 11, 2017
Free Download Adobe PhotoShop Palagins Part 3

The Plugins .Essentials Article contains new chapters clled "Using PhotoShop Plugins with Adobe Lightroom"and Moving and "moving your plugins to a New Computer
Please Click Here For Download PhotoShop Palagins
Available link for download
Saturday, December 31, 2016
Free Download Adobe PhotoShop Palagins Part 1

The Plugins .Essentials Article contains new chapters clled "Using PhotoShop Plugins with Adobe Lightroom"and Moving and "moving your plugins to a New Computer
Please Click Here For Download PhotoShop Palagins
Available link for download
Tuesday, December 13, 2016
Free Download Adobe Photoshop CS6 Full Version

MINIMUM SYSTEM REQUIREMENTS :
- OS: Microsoft ® Windows ® XP * with SP3; or Windows 7 with SP1
- Processor: Intel ® Pentium ® 4 or AMD Athlon ® 64 processor
- Memory: 1GB of RAM
- Hardisk Space: 1GB of available hard-disk space for installation; additional free space required during installation
- Resolution: 1024x768 (1280x800 recommended) display resolution with 16-bit color and 256MB (512MB recommended, required for Photoshop Extended) of VRAM
- OpenGL 2.0 capable system
- DVD-ROM drive
- Selection using the Magic Wand more rigorous
- Mercury Engine that makes existence if we liquify gk pecah2
- 3D boost (you have to support VGA Card)
- Display 3D creation and Brush changed
- Blur Gallery (this feature I like the most)
- New Crop Tool
- Drop Shadow novel, this time can make reflection: O
- Can make video
- Tool auto increasingly rigorous
- Adobe Camera RAW (so rich in Adobe Lightroom)
- Content Aware Move (automatically adjusts the color when we move the object to a canvas)
- Vector Layer (can create vector image)
- And there are many new features that I did not mention.
View Screenshot Here It Is Adobe Photoshop C S6


Full Version (161 MB)
Password TinyPaste: software8games
Click Here
Tutorial This SoftwareIn This Web:
• Tips For Using Color Adjustment Tool In Photoshop
Monday, December 12, 2016
Easy Selective Color Effect With Photoshop
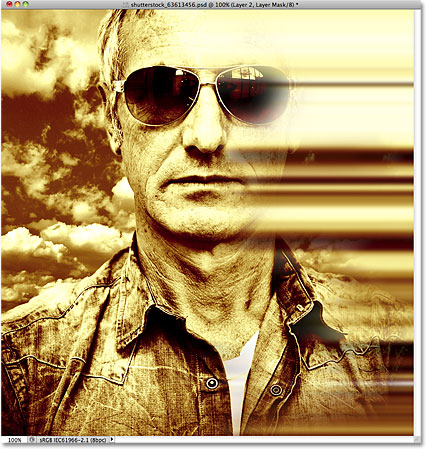

In this Photoshop Effects tutorial, well learn how to create a cool motion blur-type of effect by first colorizing a photo, then selecting a single column of pixels from the main subject and stretching it across the image to create streaks of color.
Well use a layer mask and a brush when were done to paint away the streaks in areas where we dont need them. If youre wondering where the "Dead Zone" part of the name came from, the idea for this tutorial comes from the DVD box art for the final season of one of my favorite tv shows, The Dead Zone. Ill be using Photoshop CS5, but any recent version of Photoshop will work.
Heres what the final effect will look like:
Step 1: Duplicate The Background Layer
Open the image youll be using for the effect. Heres the photo Ill be working with:
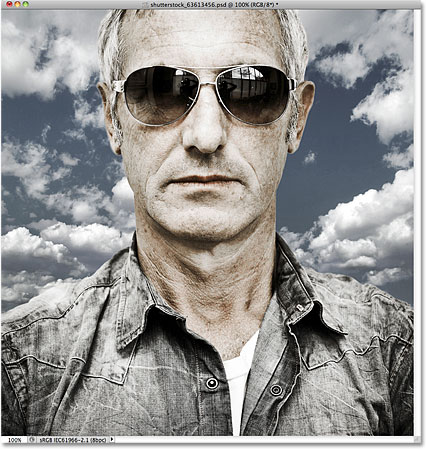
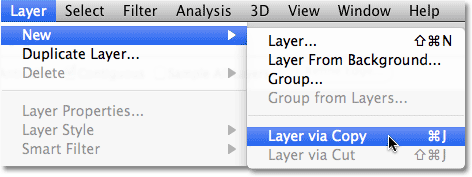
The first thing we want to do to is create a copy of the image so were not working directly on the original (in case we ever need it again later). The original image is sitting on the Background layer in the Layers panel. To make a copy of it, go up to the Layer menu in the Menu Bar along the top of the screen, choose New, then choose Layer via Copy. Or, for a faster way to copy a layer, press Ctrl+J (Win) / Command+J (Mac) on your keyboard:
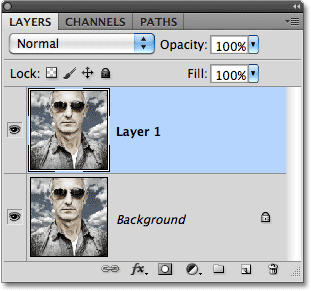
A copy of the layer, which Photoshop names "Layer 1", appears above the Background layer:
Step 2: Desaturate The Image
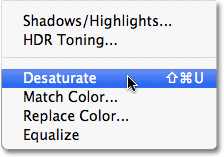
Next, before we colorize the image, lets quickly remove the original colors by desaturating the photo. Go up to the Image menu at the top of the screen, choose Adjustments, and then choose Desaturate, or press Shift+Ctrl+U (Win) / Shift+Command+U (Mac) to access the Desaturate command with the faster keyboard shortcut:
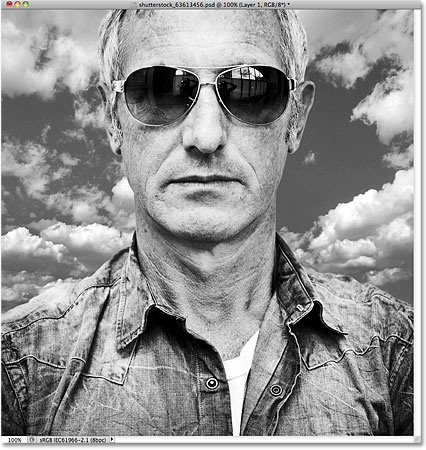
The image will now appear in black and white, although in my case, the original colors were pretty subtle to begin with:
Step 3: Colorize The Image
With the original colors out of the way, lets add our own. Go up to the Image menu once again, choose Adjustments, and then choose Color Balance:
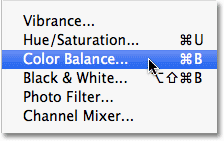
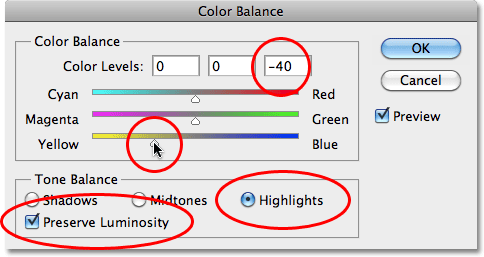
Photoshops Color Balance command allows us to choose different colors for the shadows, highlights and midtones of the image. If you want to use the same colors Im using, first select the Highlights option in the dialog box, then drag the bottom of the three color sliders towards Yellow until the right Color Levels input box shows a value of -40. This adds yellow to the highlights. Make sure the Preserve Luminosity option is checked:
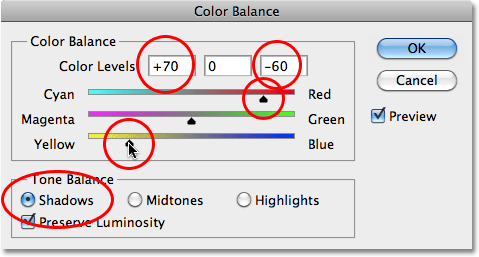
Next, select the Shadows option, then drag the top color slider towards Red until the left Color Levels input box shows a value of +70. Drag the bottom color slider once again towards Yellow until the right Color Levels input box shows -60. This adds an orange color to the shadows:
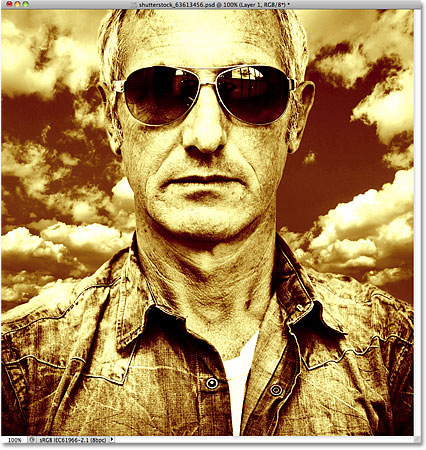
Click OK when youre done to close out of the Color Balance dialog box. The colors in your image should now look similar to this (assuming you used the same colors I did):
Step 4: Select A Single Column Of Pixels
Grab the Single Column Marquee Tool from Photoshops Tools panel. By default, its hiding behind the Rectangular Marquee Tool, so click on the Rectangular Marquee Tool and hold your mouse button down for a second or two until a fly-out menu appears, then select the Single Column Marquee Tool from the list:
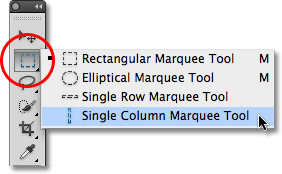
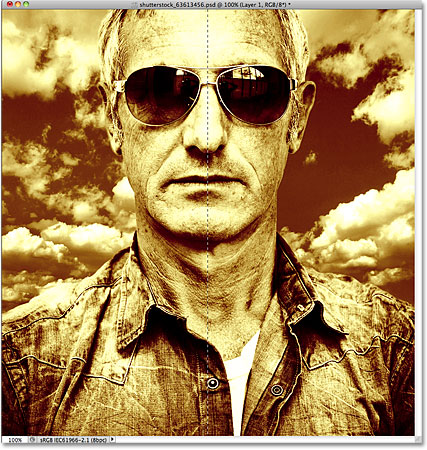
As its name implies, the Single Column Marquee Tool selects a single column of pixels in the image. Clicking anywhere in the image will select the pixel you clicked on plus every pixel above and below it from top to bottom. For this effect, we want to select a column of pixels that will divide the subject in half. Im going to click in the center of the mans nose. A very thin selection outline appears, dividing his left half from his right (it may be a little hard to see in the screenshot since the selection is only 1 pixel wide):
Step 5: Copy The Selection To A New Layer
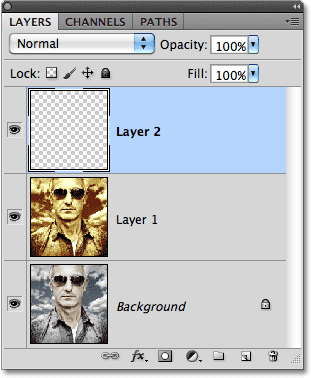
Just as we did back in Step 1, go up to the Layer menu, choose New, and then choose Layer via Copy (or press Ctrl+J (Win) / Command+J (Mac) on your keyboard) to copy the selected column of pixels to its own layer. Nothing will seem to have happened to the image in the document window, but a new layer containing the column of pixels appears above the other layers in the Layers panel. Photoshop names the layer "Layer 2" (normally we should be giving our layers more descriptive names, like "colorized" and "pixel column", but with only three layers needed for this effect, theres not much use in renaming them):
Step 6: Stretch The Column With Free Transform
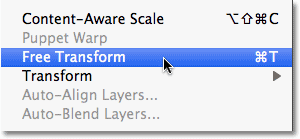
Go up to the Edit menu at the top of the screen and choose Free Transform, or press Ctrl+T (Win) / Command+T (Mac) to access Free Transform with the keyboard shortcut:
This places the Free Transform box and handles around the pixel column. Move your cursor directly over the column. Youll see it turn into two small arrows pointing left and right. Click on the column and, with your mouse button still held down, drag the column towards the right. As you drag, youll see the pixels stretching and repeating across the image:
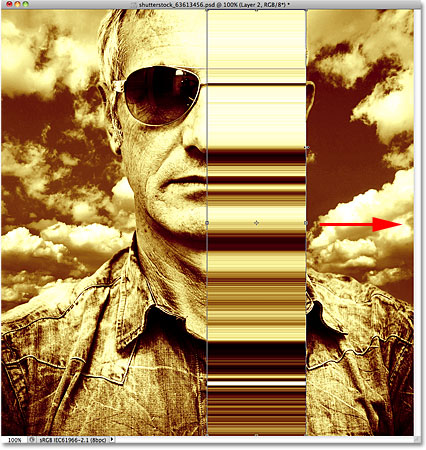
Continue dragging the column all the way to the right edge of the photo. Press Enter (Win) / Return (Mac) when youre done to apply the transformation and exit out of the Free Transform command:
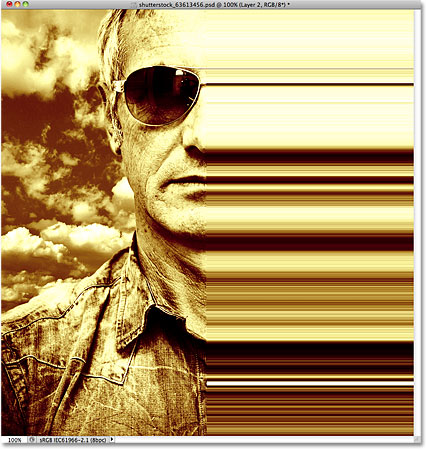
Step 7: Apply The Gaussian Blur Filter
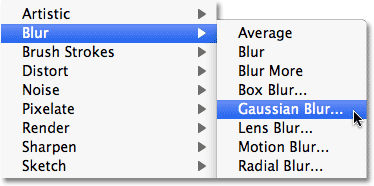
Lets apply a slight blur to the color streaks so they dont appear so sharp and well-defined. Go up to the Filter menu at the top of the screen, choose Blur, and then choose Gaussian Blur:
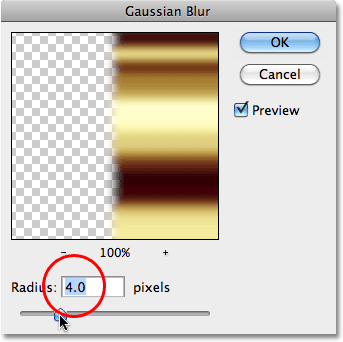
When the Gaussian Blur dialog box appears, increase the Radius value to around 4 pixels by dragging the slider a little to the right. Click OK when youre done to exit out of the dialog box and apply the blurring to the image:
The transitions between the colors are now a little softer:
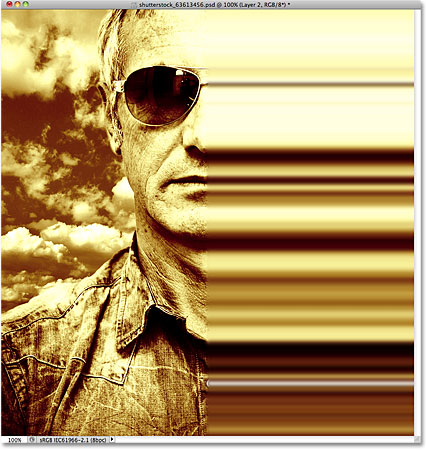
Step 8: Add A Layer Mask
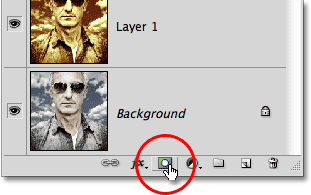
All thats left to do at this point is to blend the blur streaks in with the image, and we can do that using a layer mask. Click on the Layer Mask icon at the bottom of the Layers panel:
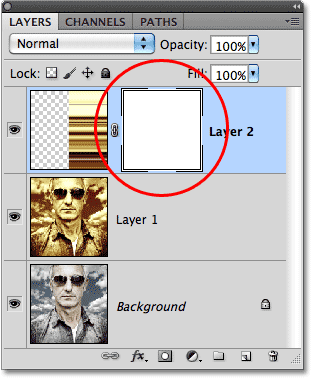
A layer mask thumbnail, filled with white, appears on Layer 2 in the Layers panel, letting us know that the mask has been added:
Step 9: Paint With Black On The Layer Mask To Hide The Color Streaks
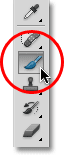
Grab the Brush Tool from the Tools panel:
Make sure the layer mask thumbnail is selected in the Layers panel (you should see a thin white highlight border around it which tells us its selected. Click on the thumbnail to select it if its not highlighted). Set your Foreground color to black by first pressing the letter D on your keyboard, which resets them to their default colors (white for the Foreground and black for the Background), then press the letter X to swap them, making black the Foreground color. You can see your current Foreground and Background colors by looking at the two color swatches near the bottom of the Tools panel:
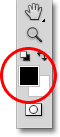
Then, with a medium or large, soft-edge brush, simply paint over sections of the color streaks to hide them and reveal the main photo underneath. You can change the size of your brush as you paint by pressing the left bracket key ( [ ) on your keyboard to make it smaller or the right bracket key ( ] ) to make it larger. Holding down your Shift key while pressing the left bracket key will make the brush edges softer. Holding Shift and pressing the right bracket key makes the edges harder, although youll want to use a soft-edge brush to create smooth transitions between the color streaks and the main image.
Here, Im painting with a large, soft-edge brush to reveal part of the mans face behind the streaks:
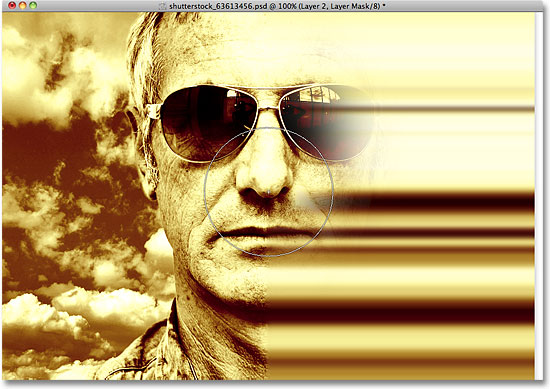
If you make a mistake and reveal too much of the main image, simply press X on your keyboard to swap your Foreground and Background colors, which sets your Foreground color to white. Paint over the problem area with white to bring back the color streaks, then press X to swap the colors again and continue painting with black.
You can also change the opacity of your brush to create even more subtle transitions between the color streaks and the main image. Simply press a number on your keyboard to change the brush opacity. For example, to set the opacity to 50%, press the number 5. For something like 25%, press 2 5 quickly. To set the brush opacity back to the full 100%, press 0 (remember to set it back to 100% when youre done to avoid possible confusion the next time you use the Brush Tool):

Ill continue painting over the color streaks using different brush sizes and opacity settings, using the X key on my keyboard to swap between black and white for my brush color as needed. Here is my final result:
 Tags :- Photoshop 8 , Photoshop 7 trick , trick for Photoshop CS6 , photoshop PNG , Png Images , image png , png , transparent images , transparent png , psd , psd image , png free , download png , png for free , png blogspot , png photoshop , photoshop png images , images for photoshop , cs5 trick , photoshop tricks , photoshop tricks , photoshop background , photoshop psd , photoshop cs5, photoshop cs5 trick,
 Available link for download
Monday, November 28, 2016
Free Download Adobe Photoshop CC 2015 32bit

Photoshop is considered as the bible for image editing. Almost every professional’s first choice while editing an image is always Photoshop. Photoshop has been offering image editing services for a long time.
Features of Adobe Photoshop CC 2015:
- Complete package for digital image processing.
- Contains advanced and handy tools.
- Ideal tool for creating 2D and 3D graphics.
- Enhanced layer composition.
- Got improved motion blur filters.
- Can also create circular and elliptical blur.
- Device Preview
- Blur Gallery
- Glyphs panel
- Camera Raw
- UI toolkit for plug-ins and scripts
Free Download Adobe Photoshop CC 2015 (32bit)

Activation File for Adobe Photoshop CC 2015 (32bit)
You may also like to download Adobe Photoshop CC 2015 (64bit)
Available link for download
Wednesday, November 2, 2016
Free Digital Scrapbook Photoshop Layer Template T0024
Scrapbooks gone Digital! has a new free product sample for you. You can find it at the end of this post.
Courtesy of our wonderful designer: SgD DESIGNS . Below you can find some of her great products, or you can visit her SgD Store to see them all: SgD DESIGNS.
 SgD DESIGNS 4th Of July Collection - The Entire Collection Price: $8.32 Created by: SgD DESIGNS |  Photoshop Layer Template # T0025 Price: $1.04 Created by: SgD DESIGNS |
 Color Your Own Papers - Set2. Commercial Use OK. Price: $2.50 Created by: SgD DESIGNS |  Photoshop Layer Template # T0013 Price: $1.04 Created by: SgD DESIGNS |
 Photoshop Layer Template # T0030 Price: $1.04 Created by: SgD DESIGNS |  Halloween Templates Price: $2.50 Created by: SgD DESIGNS |
 The Valentines Collection - Quick Page #8 Price: $1.00 Created by: SgD DESIGNS |  Photoshop Layered Package 21-30. Personal Use Only Price: $6.25 Created by: SgD DESIGNS |
 Its a Girl! - Quick Page #1 Price: $1.00 Created by: SgD DESIGNS |  Girly Monkey Collection - Quick Page #1 Price: $1.00 Created by: SgD DESIGNS |
 SgD DESIGNS Photoshop Layered Tags - Set of Four (4) Price: $1.66 Created by: SgD DESIGNS |  American Rider ( Motorcycle ) - Album Set of 8 Quick Pages Price: $4.16 Created by: SgD DESIGNS |
And here is the free product sample:

Photoshop Layer Template # T0024
by: SgD DESIGNS
Have a wonderful day!
Scrapbooks gone Digital! (SGDBLOG)
www.scrapbooksgonedigital.com
Available link for download