Sunday, December 25, 2016
Flat Color iconpack for Win10
Do you want new icon style in your desktop? Here is the new Flat Color icon pack for Win10 users. This is realy awsome icon pack, enjoy it and have fun!

Download Flat Color iconpack for Win10
Available link for download
Monday, December 12, 2016
Easy Selective Color Effect With Photoshop
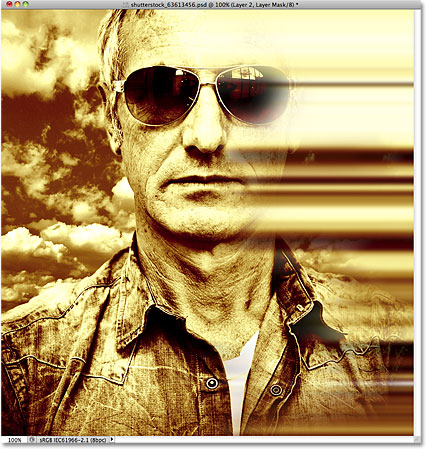

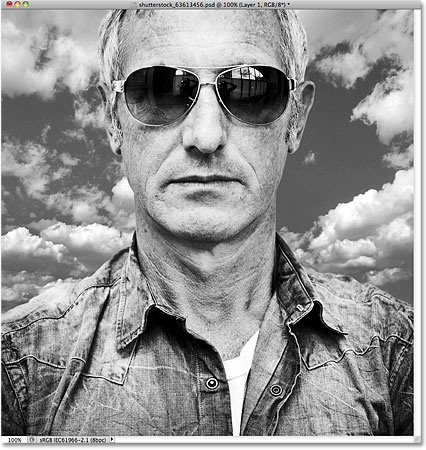
In this Photoshop Effects tutorial, well learn how to create a cool motion blur-type of effect by first colorizing a photo, then selecting a single column of pixels from the main subject and stretching it across the image to create streaks of color.
Well use a layer mask and a brush when were done to paint away the streaks in areas where we dont need them. If youre wondering where the "Dead Zone" part of the name came from, the idea for this tutorial comes from the DVD box art for the final season of one of my favorite tv shows, The Dead Zone. Ill be using Photoshop CS5, but any recent version of Photoshop will work.
Heres what the final effect will look like:
Step 1: Duplicate The Background Layer
Open the image youll be using for the effect. Heres the photo Ill be working with:

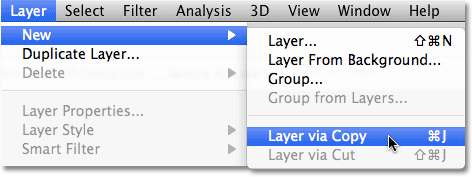
The first thing we want to do to is create a copy of the image so were not working directly on the original (in case we ever need it again later). The original image is sitting on the Background layer in the Layers panel. To make a copy of it, go up to the Layer menu in the Menu Bar along the top of the screen, choose New, then choose Layer via Copy. Or, for a faster way to copy a layer, press Ctrl+J (Win) / Command+J (Mac) on your keyboard:
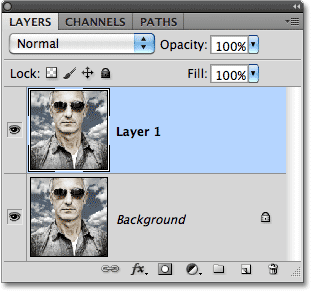
A copy of the layer, which Photoshop names "Layer 1", appears above the Background layer:
Step 2: Desaturate The Image
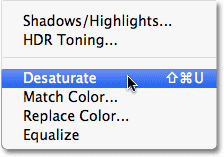
Next, before we colorize the image, lets quickly remove the original colors by desaturating the photo. Go up to the Image menu at the top of the screen, choose Adjustments, and then choose Desaturate, or press Shift+Ctrl+U (Win) / Shift+Command+U (Mac) to access the Desaturate command with the faster keyboard shortcut:
The image will now appear in black and white, although in my case, the original colors were pretty subtle to begin with:
Step 3: Colorize The Image
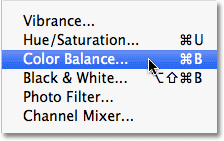
With the original colors out of the way, lets add our own. Go up to the Image menu once again, choose Adjustments, and then choose Color Balance:
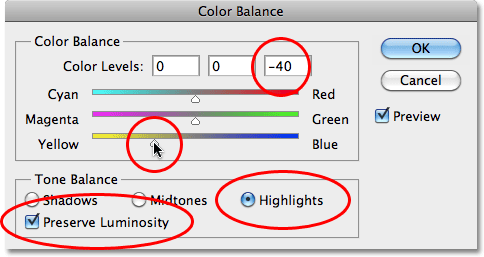
Photoshops Color Balance command allows us to choose different colors for the shadows, highlights and midtones of the image. If you want to use the same colors Im using, first select the Highlights option in the dialog box, then drag the bottom of the three color sliders towards Yellow until the right Color Levels input box shows a value of -40. This adds yellow to the highlights. Make sure the Preserve Luminosity option is checked:
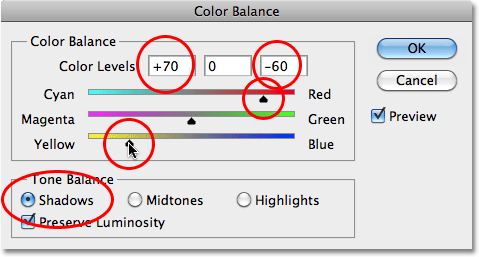
Next, select the Shadows option, then drag the top color slider towards Red until the left Color Levels input box shows a value of +70. Drag the bottom color slider once again towards Yellow until the right Color Levels input box shows -60. This adds an orange color to the shadows:
Click OK when youre done to close out of the Color Balance dialog box. The colors in your image should now look similar to this (assuming you used the same colors I did):

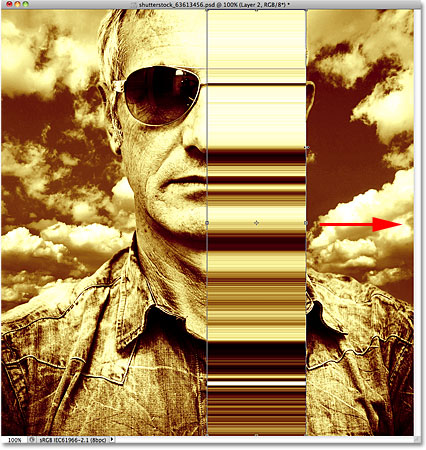
Step 4: Select A Single Column Of Pixels
Grab the Single Column Marquee Tool from Photoshops Tools panel. By default, its hiding behind the Rectangular Marquee Tool, so click on the Rectangular Marquee Tool and hold your mouse button down for a second or two until a fly-out menu appears, then select the Single Column Marquee Tool from the list:
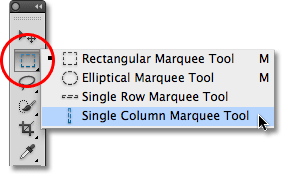
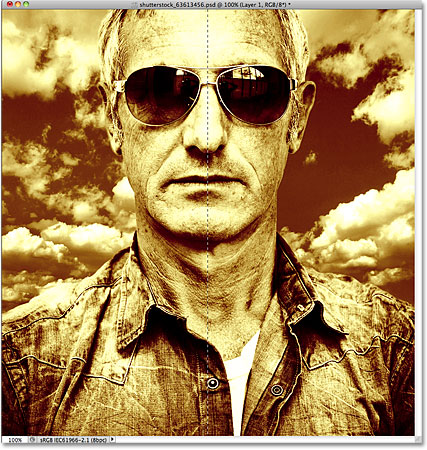
As its name implies, the Single Column Marquee Tool selects a single column of pixels in the image. Clicking anywhere in the image will select the pixel you clicked on plus every pixel above and below it from top to bottom. For this effect, we want to select a column of pixels that will divide the subject in half. Im going to click in the center of the mans nose. A very thin selection outline appears, dividing his left half from his right (it may be a little hard to see in the screenshot since the selection is only 1 pixel wide):
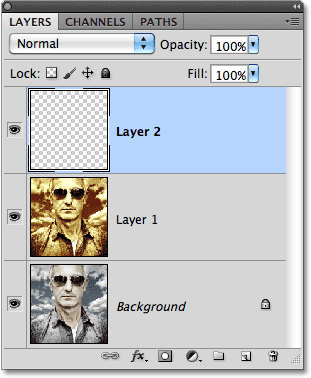
Step 5: Copy The Selection To A New Layer
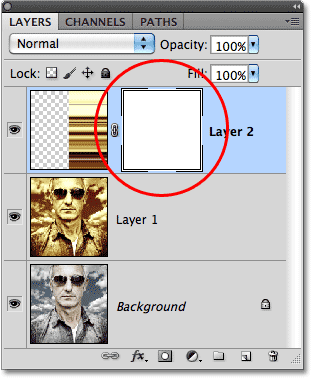
Just as we did back in Step 1, go up to the Layer menu, choose New, and then choose Layer via Copy (or press Ctrl+J (Win) / Command+J (Mac) on your keyboard) to copy the selected column of pixels to its own layer. Nothing will seem to have happened to the image in the document window, but a new layer containing the column of pixels appears above the other layers in the Layers panel. Photoshop names the layer "Layer 2" (normally we should be giving our layers more descriptive names, like "colorized" and "pixel column", but with only three layers needed for this effect, theres not much use in renaming them):
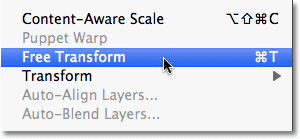
Step 6: Stretch The Column With Free Transform
Go up to the Edit menu at the top of the screen and choose Free Transform, or press Ctrl+T (Win) / Command+T (Mac) to access Free Transform with the keyboard shortcut:
This places the Free Transform box and handles around the pixel column. Move your cursor directly over the column. Youll see it turn into two small arrows pointing left and right. Click on the column and, with your mouse button still held down, drag the column towards the right. As you drag, youll see the pixels stretching and repeating across the image:
Continue dragging the column all the way to the right edge of the photo. Press Enter (Win) / Return (Mac) when youre done to apply the transformation and exit out of the Free Transform command:
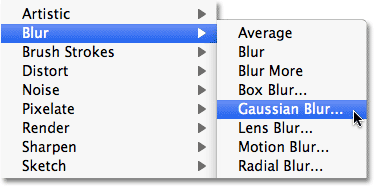
Step 7: Apply The Gaussian Blur Filter
Lets apply a slight blur to the color streaks so they dont appear so sharp and well-defined. Go up to the Filter menu at the top of the screen, choose Blur, and then choose Gaussian Blur:
When the Gaussian Blur dialog box appears, increase the Radius value to around 4 pixels by dragging the slider a little to the right. Click OK when youre done to exit out of the dialog box and apply the blurring to the image:
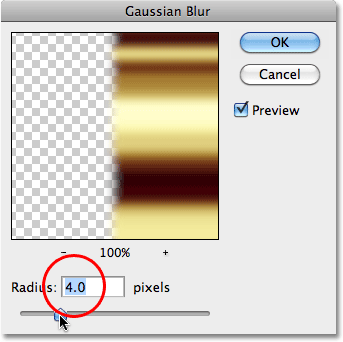
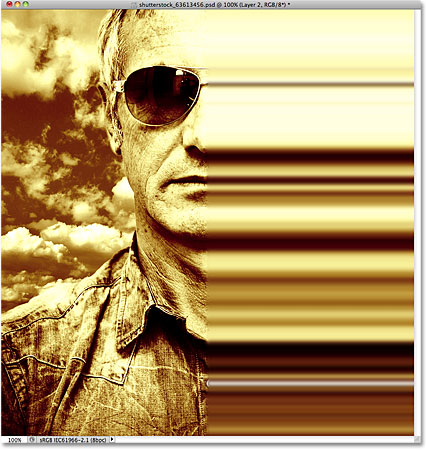
The transitions between the colors are now a little softer:
Step 8: Add A Layer Mask
All thats left to do at this point is to blend the blur streaks in with the image, and we can do that using a layer mask. Click on the Layer Mask icon at the bottom of the Layers panel:
A layer mask thumbnail, filled with white, appears on Layer 2 in the Layers panel, letting us know that the mask has been added:
Step 9: Paint With Black On The Layer Mask To Hide The Color Streaks
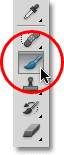
Grab the Brush Tool from the Tools panel:
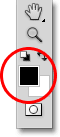
Make sure the layer mask thumbnail is selected in the Layers panel (you should see a thin white highlight border around it which tells us its selected. Click on the thumbnail to select it if its not highlighted). Set your Foreground color to black by first pressing the letter D on your keyboard, which resets them to their default colors (white for the Foreground and black for the Background), then press the letter X to swap them, making black the Foreground color. You can see your current Foreground and Background colors by looking at the two color swatches near the bottom of the Tools panel:
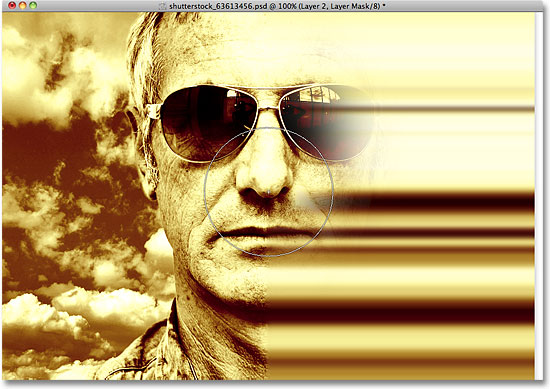
Then, with a medium or large, soft-edge brush, simply paint over sections of the color streaks to hide them and reveal the main photo underneath. You can change the size of your brush as you paint by pressing the left bracket key ( [ ) on your keyboard to make it smaller or the right bracket key ( ] ) to make it larger. Holding down your Shift key while pressing the left bracket key will make the brush edges softer. Holding Shift and pressing the right bracket key makes the edges harder, although youll want to use a soft-edge brush to create smooth transitions between the color streaks and the main image.
Here, Im painting with a large, soft-edge brush to reveal part of the mans face behind the streaks:
If you make a mistake and reveal too much of the main image, simply press X on your keyboard to swap your Foreground and Background colors, which sets your Foreground color to white. Paint over the problem area with white to bring back the color streaks, then press X to swap the colors again and continue painting with black.
You can also change the opacity of your brush to create even more subtle transitions between the color streaks and the main image. Simply press a number on your keyboard to change the brush opacity. For example, to set the opacity to 50%, press the number 5. For something like 25%, press 2 5 quickly. To set the brush opacity back to the full 100%, press 0 (remember to set it back to 100% when youre done to avoid possible confusion the next time you use the Brush Tool):

Ill continue painting over the color streaks using different brush sizes and opacity settings, using the X key on my keyboard to swap between black and white for my brush color as needed. Here is my final result:
 Tags :- Photoshop 8 , Photoshop 7 trick , trick for Photoshop CS6 , photoshop PNG , Png Images , image png , png , transparent images , transparent png , psd , psd image , png free , download png , png for free , png blogspot , png photoshop , photoshop png images , images for photoshop , cs5 trick , photoshop tricks , photoshop tricks , photoshop background , photoshop psd , photoshop cs5, photoshop cs5 trick,
 Available link for download
Saturday, November 19, 2016
Fitur Lengkap Printer Samsung CLX 4195FW Color Multifunction


Spesifikasi lengkap Samsung CLX-4195FW | |
Fungsi standart | Print, Scan, Copy, dan Fax |
Prosesor | Dual Cpu (Main 533Mhz dan sub 150 Mhz) |
Operational Fanel | Lcd 4.3 inch touch screen |
Memori standart | 256Mb dan maksimum 512Mb |
Interface | Hi-speed usb 2.0/10/100/1000 base tx, Wireless 802.11b/g/n |
Dimensi | 420x426x448mm |
Berat printer | 21,44 Kg |
Duti Cycle | Sampai 40.000 lembar |
Kecepatan cetak | Mono 18ppm A4 dan warna 18pp A4 |
Resolusi | Up to 9600x600Dpi |
Konsumsi daya | 380w printing/50w standby, 2,4w power save, 3,6w power save wifi direct on, |
Operating system | Windows 8/7/vista/2008R2/2008/2003/ mac os 10,4-10,8/various linux/unix |
Available link for download
Thursday, November 10, 2016
FACEBOOK MULTI COLOR CHAT TEXT CODE GENERATOR BY TECHNOCLOUDS Version 2 0
Chat with your facebook friends in colored text with latest facebook color chat text code generator.Take a look at the picture below.

|
Available link for download